PlymouthCreate and ePorts
Recommended First Steps (Intermediate)
PSU Open CoLab
These recommended steps are for students using WordPress on Plymouth Create. They are meant to be a starting place. Once you get more familiar with WordPress, we encourage you to customize and change your site to reflect your own personal goals and choices. Before you begin these steps, make sure you’ve first Set up Plymouth Create and Installed WordPress.
(If you aren’t using WordPress, you’ll need to figure out how to do these things with whatever tool you’ve chosen. If you can’t do exactly the same thing with your tool, just get as close as possible. )
Step 1. Create an “About” Page
Somewhere on your site, you need a page that explains who you are and what this site is. How much you want to share about yourself is up to you. (You can use a pseudonym or nickname if you want.) The key is to think like a person just happening upon the site and wondering what it is that they’ve found.
Add a picture to your About page. It doesn’t need to be a picture of you. But the web is a visual medium, and the more you can take advantage of that, the better.
Learn more about creating and editing pages in WordPress.
Step 2: Create a blog section for your site–or make your site into a blog
Most of the work you do for this course and for IDS Senior Seminar will be shared via blog posts on your site. Why? Because blog posts are designed to share your latest news, information, or updates. They’re also presented in reverse chronological order, making it easy for your visitors to find your most recent posts.
There are two ways your blog can be presented on your site:
- Make your blog your home page; visitors will always see your latest blog posts when they come to your site.
- Under Settings -> Reading, make sure “Your latest posts” is selected for “Your homepage displays.”
- If you take this approach, make sure you also add your “About” page to your menu (see Step 9 below).
- Create a blog “holder” page.
- Create a Page titled “Blog.” You shouldn’t put any content on this page. It’s just a “holder” page that will always display your latest blog posts.
- Under Settings -> Reading, make sure “A static page” is selected for “Your homepage displays.”
- Choose a page other than “Blog” to serve as your home page (for example, use your About page!)
- Choose your “Blog” page for your posts page.
- If you take this approach, make sure you also add your “Blog” page to your menu (see Step 9 below)
Step 3: Create your first ePort post
Now that you know where your blog posts are going to appear, it’s time to start writing. Writing a post is basically the same as writing a page. One main difference is that blog posts can be organized into categories and you can add tags to them. Categories and tags make it easier for you to organize your content and easier for your visitors to find content that is similar.
Another great feature of posts to use is “featured images.” If you attach a featured image to a post, most WordPress themes will display a version or thumbnail of them on your blog page as well as on individual posts.
Learn more about creating and editing posts in WordPress.
Step 4: Make sure to allow comments on posts
Comments are usually enabled by default whenever you write a new blog posts. In this class, we will be commenting on each other’s posts, so please enable comments on your site. You may, however, want to leave on moderation so that you can approve comments before they are published.
You can find all your comment settings under Settings -> Discussion.
As commenting gets started (and depending upon your discussion settings) you may periodically get emails letting you know someone has left a comment on one of your posts. Depending upon your settings again, you may need to approve comments as they are submitted. Make sure you do this so we can all read/respond to each other’s ideas.
Inevitably, with comments enabled on your site, you will begin to receive comment spam. Every WordPress site on Plymouth Create comes with the Akismet plugin preloaded; this plugin is great at identifying and disposing of comment spam as it arrives, but you’ll need to configure it. Go to Plugins and click Activate for Akismet. Then follow the instructions to get it up and running.
Step 5: Hyperlink Tricks
Whenever you create content on your site (in posts or pages), consider where you can add links to other sites. These could be other students’ websites, the course site, articles you’ve read, etc. The web only works when we create links; so make sure you’re good about contributing links on your own site.
Here are some best practices for creating good hyperlinks in WordPress:
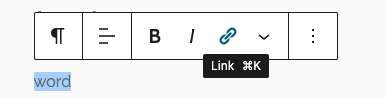
- Highlight some text that you want to turn into a hyperlink
- Then, with the text highlighted, click the link button in the WP formatting menu (this looks like a chain link).
- Type/paste the URL of the link you want to add.
- Click Return to save the link.
Hint: The best type of links are embedded hyperlinks rather than naked URLs like https://en.wiktionary.org/wiki/hyperlink.
Step 6: Create a Menu
Putting up content on your site is great, but you also need to help your visitors find what you’ve created. For that, you’ll want to set up a menu:
- Go to Appearance -> Menus.
- Click the link Create a new menu at the top of the page.
- Enter a name for your new menu in the Menu Name box
- Click the Create Menu button.
- Locate the pane entitled Pages.
- Within this pane, select the View All link to bring up a list of all the currently published Pages on your site.
- Select the Pages that you want to add by clicking the checkbox next to each Page’s title.
- Click the Add to Menu button located at the bottom of this pane to add your selection(s) to the menu that you created in the previous step.
- Click the Save Menu button once you’ve added all the menu items you want.
- Scroll to the bottom of the menu editor window.
- Under Menu Settings -> Display location, click the check box for the location where you want your menu to appear. (This will vary depending upon the theme you are using)
- Click Save Menu once you’ve made your selection.
Additional Menu Tips:
- If you like, you can also add categories or tags to your menu; if a user clicks on one of these, they will see all the posts in that category or associated with that tag.
- If you drag menu items to the left, they will indent. This creates a drop-down menu on the front-end of your site.
Learn more about working with menus in WordPress.
Step 7: Adjust Your Site’s Appearance
Once you have at least an About page, your first blog post, and a menu, you have the basic outline of your ePort and can begin adjusting how it looks and works. Nothing is permanent on the internet — you’re not writing in stone! — so don’t be afraid to play around until you’ve gotten your site looking the way you want it to look.
To explore your theme go to Appearance -> Customize. You’ll see any options that your theme let’s you modify. Make changes and see how they affect the look of your site in the preview panel. If you like what you see, click the Publish button.
If you’re not impressed with your theme, you can install a different one:
- Go to Appearance -> Themes and click the Add New button.
- The initial page is the Search Theme page, and it’s not all that helpful (or visual). You can check a few “filter” boxes to see what comes up. We also recommend clicking the Featured link at the top to see a visual examples of other themes you can install. You can also click Newest or Recently Updated.
- Under the thumbnail picture of each theme (when you hover your mouse over the theme) are three choices – Install, Preview, and Details & Preview. Those choices should be pretty self-explanatory so click Install to add a new theme to your site.
- After you install the theme, it is still not active on your site. You will need to Activate it to use it.
- Once activated, your site will be using the new theme. Visit your site’s homepage to view your new theme.
- Go back to Appearance -> Customize to change the settings of your new theme.
A few more theme tips:
- Themes are created by different developers all over the world. Therefore, they are all different and have different options you can customize. Have fun exploring the options and remember you can always change something back if you don’t like it.
- Most themes make use of the Customize panel we’ve mentioned, but some (especially more complicated) themes may have their own options page. If this is the case, you should see a new submenu item under Appearance show up after you install a theme. Feel free to explore these options just like you would those on the standard Customize panel.
